Visual Studio Code (VSCode) is a powerful, open-source code editor that can also serve as an excellent note-taking client. By leveraging its Markdown support and extensive extension ecosystem, you can transform VSCode into a robust alternative to proprietary note-taking apps like Obsidian. Here’s a step-by-step guide to setting up my VSCode for taking notes in Markdown format.

Why Use VSCode for Note-Taking?#
Note taking apps like Obsidian has everything I need for my notes except:
- Open Source: VSCode is completely open source, ensuring transparency and community-driven development.
- Online edit notes (for free): Use GitHub Codespaces to edit your online notes, providing a cloud-based, customizable, and collaborative environment directly within your browser
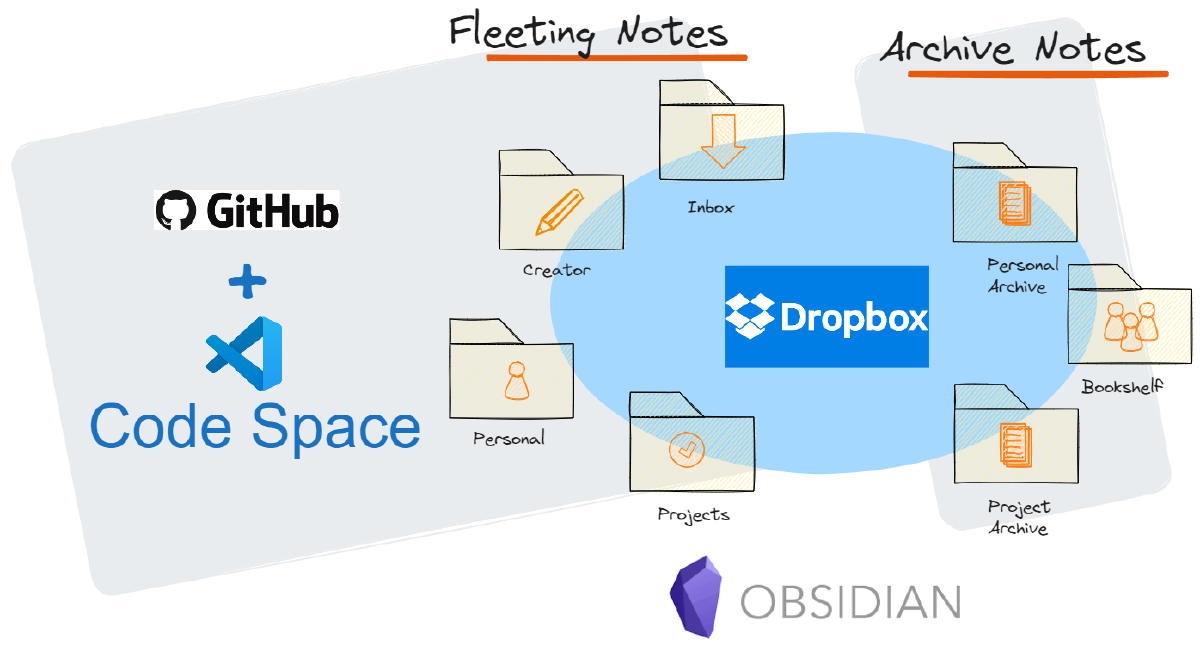
I use VS Code in my note-taking system exclusively for writing and managing fleeting notes, not for archiving or managing heavy files.
VSCode is not a native note-taking client and doesn’t offer every feature that Obsidian provides out of the box. However, with its robust extension ecosystem and customizable settings, VSCode can simulate many of the most useful features found in Obsidian. By leveraging extensions for Markdown support, preview enhancements, and organizational tools, users can create a highly functional and efficient note-taking environment within VSCode. While it may require some initial setup and configuration, this flexibility allows users to tailor their note-taking experience to their specific needs and preferences.
Obsidian features I can’t live without#
Link Between Notes#
Obsidian allows users to create links between notes easily. By using double square brackets [[Note Title]], you can link to another note within your vault. This helps in building a network of related notes, making it easier to navigate and find information.
Backlinks#
Backlinks in Obsidian show you all the notes that link to the current note you are viewing. This feature helps to track connections and references between your notes, providing context and revealing relationships you might not have noticed. Backlinks are displayed in a pane that can be toggled on and off.
Graph#
The graph view in Obsidian provides a visual representation of your notes and their connections. Each note is a node, and links between notes are edges connecting these nodes. This visualization helps in understanding the structure of your knowledge base and discovering new insights by seeing how your notes interrelate.
Notes Templates#
Obsidian supports note templates, allowing you to define reusable structures for your notes. Templates can include pre-defined text, headings, and even special placeholders for dynamic content like dates or links. This feature streamlines the creation of new notes, ensuring consistency and saving time.
Paste Images#
In Obsidian, you can paste images directly into your notes. When you paste an image, it gets stored in your vault, and a link to the image is inserted into your note. This feature is useful for adding visual content quickly without having to manually upload and link images.
Paste Web Links#
When you paste a web link into an Obsidian note, the application can automatically format it as a clickable hyperlink. Additionally, some plugins can enhance this feature by fetching and displaying metadata from the linked page, such as the title and a brief description, providing more context to the link.
Opportunities of VS Code#
Using VS Code to write IPython notebooks presents a unique opportunity that many other note-taking clients do not support. VS Code integrates seamlessly with Jupyter, allowing for the creation, editing, and execution of IPython notebooks directly within the editor. This feature is particularly advantageous for users who require advanced computational capabilities, as it combines the robust coding environment of VS Code with the interactive data analysis and visualization strengths of Jupyter notebooks. This integration enables a streamlined workflow where code, output, and narrative text coexist in a single document, enhancing productivity and facilitating a deeper understanding of complex subjects. Consequently, for those who need to document computational processes or analyze data within their notes, VS Code offers a powerful and flexible solution that many traditional note-taking applications lack.
Setting Up VSCode for Note-Taking#
Step 1: Install VSCode#
If you haven’t already, download and install Visual Studio Code from the official website.
Step 2: Customize VSCode for Note-Taking#
Set Markdown as the Default Language: To make Markdown the default language for new files, add the following setting in your
settings.jsonfile:"files.defaultLanguage": "markdown"Enable Markdown Preview: Use the shortcut
Ctrl+Shift+V(orCmd+Shift+Von macOS) to open a Markdown preview side-by-side with your editor. This allows you to see the rendered output of your notes as you type.Enable Auto Save: Enable auto-save to ensure your notes are saved automatically as you work. Go to
File > Auto Saveand select your preferred auto-save interval.
Step 3: Install Essential Extensions#
To optimize VSCode for note-taking, install the following extensions:
- Markdown All in One : This extension provides a comprehensive suite of Markdown tools, including shortcuts, previews, and table of contents generation.
- Markdownlint: This extension helps maintain consistent Markdown formatting by providing linting and style checking.
- Foam: Enhance your note-taking and personal knowledge management with Foam, a powerful extension for creating and maintaining interconnected markdown notes directly within VS Code.
- Office Viewer: View and edit Microsoft Office documents seamlessly within VS Code, integrating Word, Excel, and PowerPoint files into your development and documentation workflow.
- Draw.io: Create and edit diagrams with ease using the Draw.io extension, providing a robust, integrated diagramming tool within the VS Code environment.
- Excalidraw: Bring hand-drawn style diagrams and sketches into VS Code with Excalidraw, perfect for visual thinkers and designers who need to illustrate concepts quickly.
- Markmap: Visualize markdown documents as mind maps using Markmap, helping to organize and explore complex ideas through an interactive, visual format in VS Code.
- Marp for VS Code: Create stylish presentations with markdown using Marp for VS Code, transforming your markdown files into elegant slide decks effortlessly.
- Material Icon Theme: Beautify your VS Code workspace with Material Icon Theme, offering a comprehensive set of icons to enhance file and folder visibility and organization.
- Open in External App: Easily open files in external applications from within VS Code, allowing you to leverage the best tools for specific tasks while maintaining a cohesive workflow.
- Jupyter Notebook: Seamlessly view and edit Jupyter notebooks in VS Code with the Jupyter Notebook extension, combining code execution, rich text, and interactive outputs within a single interface.
Tips & Tricks#
- Shortcuts: Familiarize yourself with VSCode shortcuts to speed up your note-taking process. For instance,
Ctrl+B(orCmd+Bon macOS) toggles the sidebar visibility. - Snippets: Create custom snippets for frequently used Markdown elements to save time. Go to
File > Preferences > User Snippetsand select Markdown. - Sync Notes: Use Github to sync your notes across multiple devices.
By following these steps, you can transform VSCode into a powerful, flexible, and open-source note-taking client. Enjoy the benefits of a streamlined, customizable note-taking process and take your productivity to the next level. Happy note-taking!